Building automations with Maestro
Maestro is the build engine that proposes a plan of actions, builds the ones you confirm, and lets you undo any of them.
Maestro is the build engine behind Walli-AI. You describe what you want set up, it proposes a plan of concrete actions, and it builds the ones you confirm: agents, workflows, schedules, tools, and more. Every action it takes is individually reversible. This article explains the three-part loop (converse, execute, undo), where Maestro is launched from, and where its output lands.
What you can do
- Describe a goal in plain language and get a proposed plan of build actions.
- Review each action, deselect the ones you do not want, and build the rest in one click.
- Undo any action Maestro took, individually, from an activity log.
Where Maestro comes from
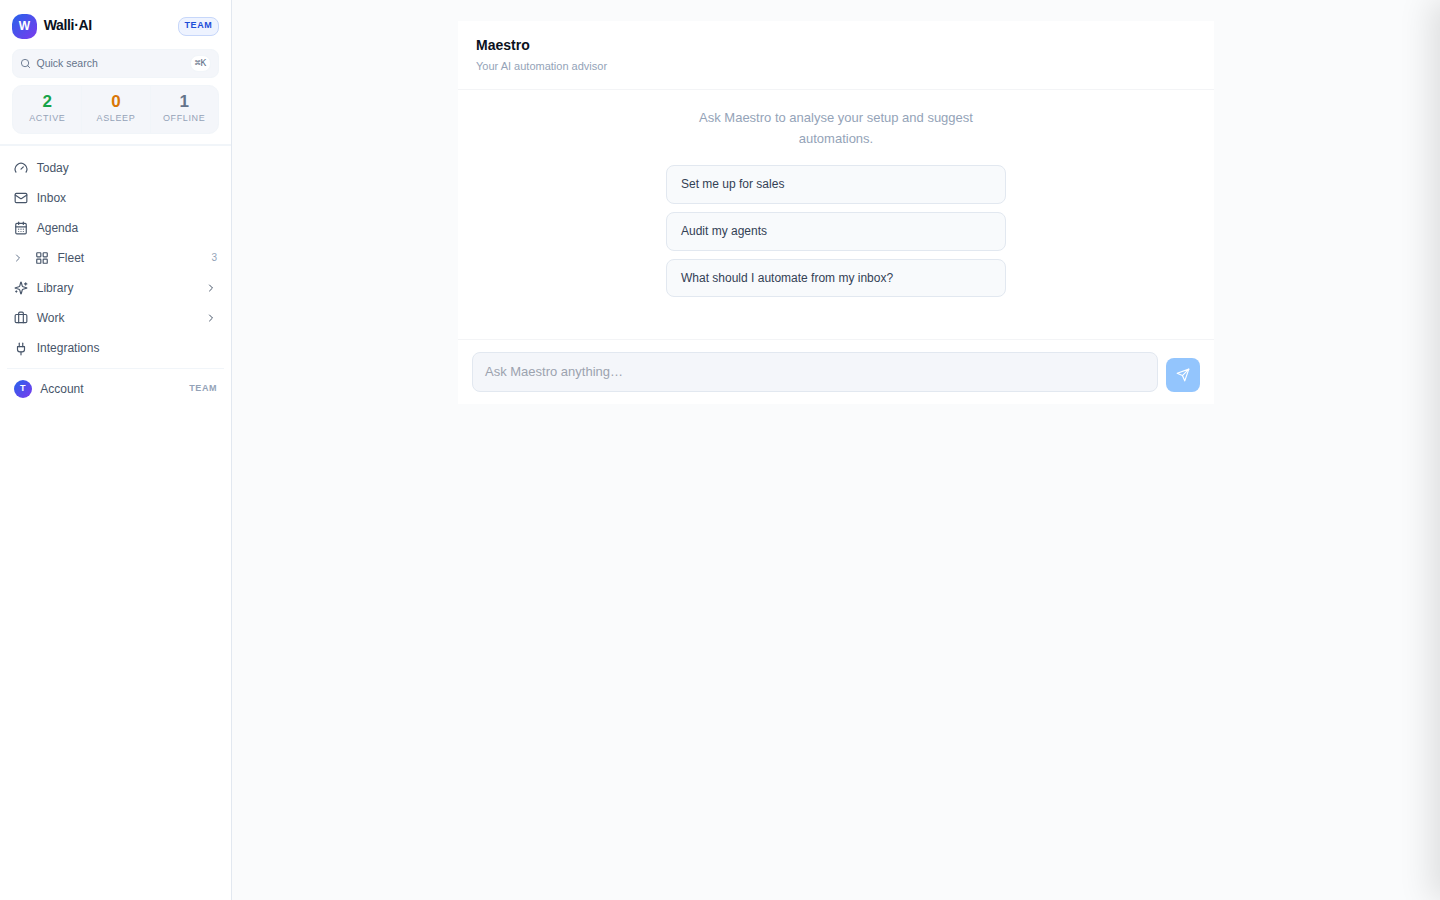
Maestro is a build engine, not a chat you keep open. It is not in the sidebar. It opens in two situations: when one of your agents delegates a build to it (the agent hands off a request and Maestro starts working on it), and during first-run onboarding when you are setting up your workspace. When it opens it appears as a panel titled Maestro with the subtitle "Your AI automation advisor." You can also reach the panel directly at /maestro.
Converse: describe what you want
The panel starts with a prompt to "Ask Maestro to analyse your setup and suggest automations" and a few starter chips such as Set me up for sales, Audit my agents, and What should I automate from my inbox?. Type into the Ask Maestro anything... box (Enter sends, Shift+Enter adds a line) and Maestro replies as it reasons, showing status lines while it works and assistant messages as it responds.
Before Maestro reads any of your connected data for the first time, it asks for your consent. This is a one-time gate so you know when it is about to look at your accounts to make its suggestions.
Execute: confirm a plan to build it
When Maestro has a concrete proposal it renders a Proposed plan card listing the actions it would take. This is the key safety property: Maestro does not build anything until you confirm.
- Each action row has a checkbox (all checked by default), a title, and its action type. Expand a row to see the exact parameters Maestro would use.
- Uncheck any action you do not want. The footer count updates to show how many are selected.
- Click Confirm & build to run the selected actions. The card shows progress while it builds and marks the plan Done when it finishes.
Each action reports its own result as it runs: succeeded, failed (with the error shown inline), or skipped. If an action needs you to connect an account first, it shows a Connect button that takes you through authorization before the build continues.
Undo: reverse anything it did
Everything Maestro builds is tracked in an Activity log, and every successful action can be undone.
- Open the Activity log to see each action Maestro took, with its type, the object it created, and when it ran.
- A successful action shows an Undo button. Click it to reverse that specific action; the log then marks it Undone.
Because each action is reversible on its own, you can confirm a broad plan, keep what worked, and cleanly back out anything you did not want, without unpicking the rest by hand.
Where Maestro's output lands
Maestro builds real platform objects, not chat text. When it creates an agent, that agent shows up in your Fleet. When it creates a workflow, it appears on the Workflows list. Schedules it sets up appear on the Schedules calendar, and tools on the Tools page. In other words, Maestro is a faster way to produce the same objects you could build by hand on those pages, and once built they behave exactly like anything you created yourself.
Maestro versus building by hand
- Use Maestro when you want to stand up several related pieces at once ("set me up for sales" might create an agent, a couple of workflows, and their schedules) and would rather review a plan than click through each screen.
- Build by hand on the individual pages when you want fine control over a single object, or you already know exactly what you want.
Either way the result is the same kind of object, so you can start with Maestro and refine on the individual pages afterward.
A practical way to think about the split: Maestro is best at the initial scaffold, when you have a goal but not yet a set of concrete objects. Once the pieces exist, day-to-day changes (renaming a workflow, adjusting a cron, swapping an agent's model) are quicker to make directly on the Workflows, Schedules, and Fleet pages, where each control is right in front of you. Nothing prevents you from returning to Maestro later for the next round of scaffolding; the two approaches compose cleanly because they produce identical objects.
Tips
- Start from a starter chip if you are not sure what to ask; it gives Maestro enough to propose a first plan you can prune.
- Read the expanded parameters on an action before you build it, so you know exactly what it will create.
- Deselect rather than cancel: uncheck the actions you do not want and keep the ones you do, instead of throwing away the whole plan.
- If you change your mind after building, use the Activity log's Undo rather than manually deleting the created objects.