Adding teammates and setting roles
Invite teammates by email, give each a role that controls what they can do, set per-member usage caps, transfer ownership, and remove members.
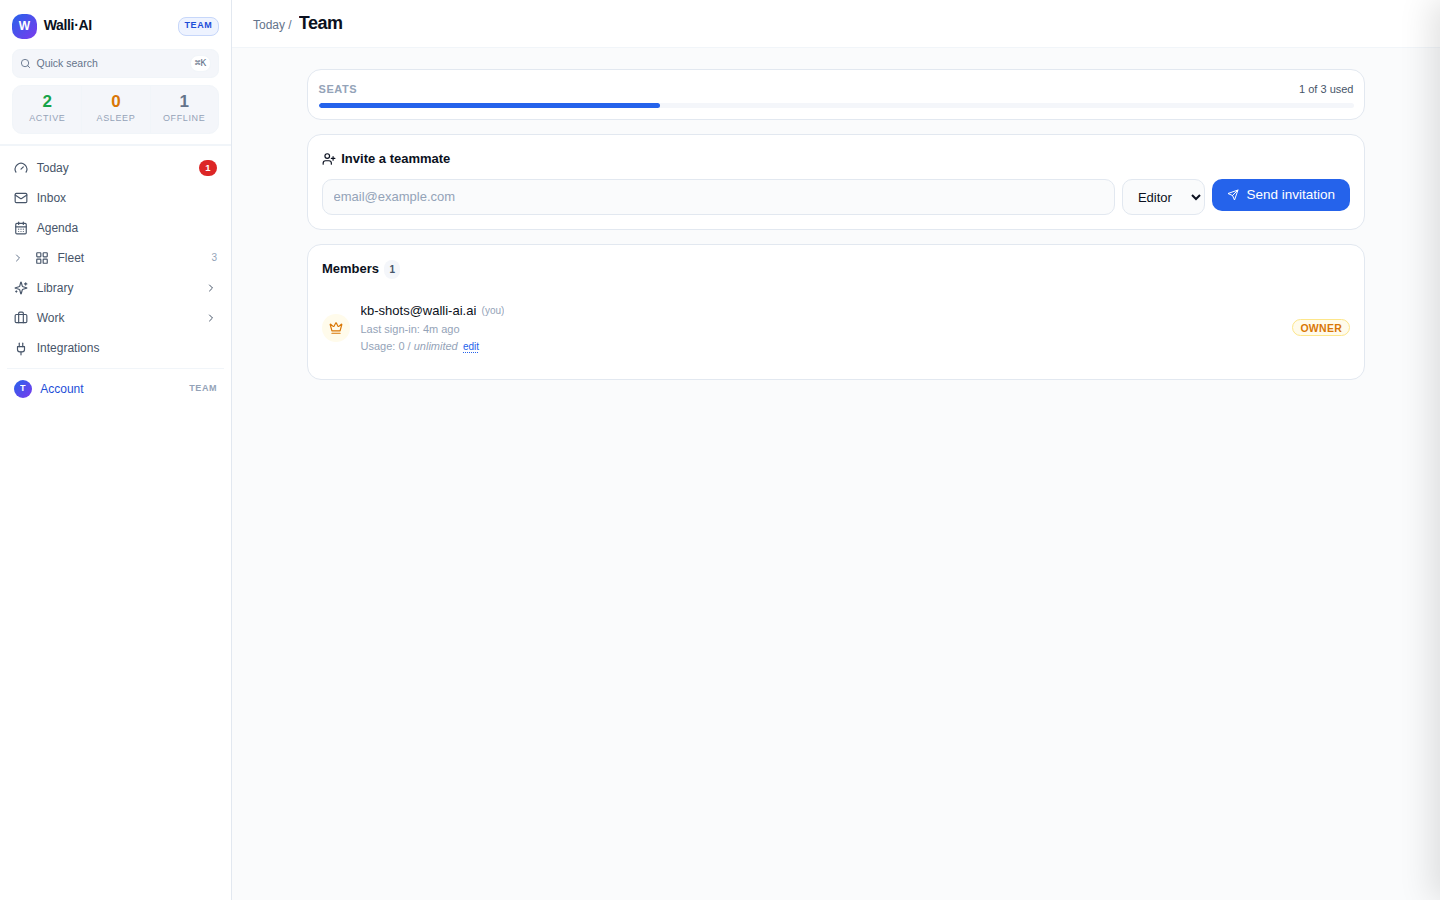
A workspace is shared: everyone you invite works on the same agents, workflows, tables, and deliverables. The Team page is where you bring people in, decide what each of them can do, watch how many seats you have left, and hand off or remove access when things change. This article walks the whole page top to bottom: the seat meter, the invite form, pending invitations, the member list with role changes, per-member usage caps, ownership transfer, and removal.
What you can do
- Invite teammates by email and assign each a starting role.
- Track how many seats your plan gives you and how many are used or pending.
- Change a member's role at any time, or revoke an invitation before it is accepted.
- Set an optional monthly usage cap per member so one person cannot burn the whole budget.
- Transfer ownership of the workspace to another admin.
- Remove a member, or leave the workspace yourself, with authored content reassigned to the owner.
Open the Team page
- Open the user-avatar menu at the bottom of the sidebar and choose Team (
/team). - The page loads your current members, any pending invitations, and your seat count. Anyone with viewer access and up can open this page and read it, but every change is gated by role on the server, so a viewer who tries to force a change through the browser console gets a permission error.
Understand roles
Every member holds exactly one role, shown as a colored pill next to their name. Roles are a ladder from most to least privileged:
- Owner. Full control, including billing and plan changes. There is exactly one owner, marked with a crown. The owner cannot be removed or have their role changed from this screen; ownership moves only through a deliberate transfer.
- Admin. Manages the workspace: invites and removes members, changes roles, and configures agents and integrations. Admins can do almost everything except billing and transferring ownership.
- Editor. Builds and runs things: creates and edits agents, workflows, schedules, and tables, and runs tasks. Editors cannot manage members.
- Viewer. Read-only access to results and configuration. Good for stakeholders who need visibility but should not change anything.
When you invite someone or change a role, the three assignable roles are Admin, Editor, and Viewer. Owner is intentionally not in that list because the only path to owner is an ownership transfer, covered below.
Watch your seats
Above the invite form, a Seats meter shows used of total, plus a pending count when invitations are outstanding. Your plan sets the total: the Team plan includes 3 seats, Business includes 10, and Scale includes 15. The Solo plan is single-seat, so on Solo the Team page shows an upgrade banner instead of the invite form. The meter turns amber when you have one seat or fewer left, a soft warning before an invite fails. A pending invitation holds a seat until it is accepted or revoked, so the pending count matters when you are close to the cap.
If you are out of seats, free one by revoking a pending invite or removing a member, or move to a larger plan. See Plans, billing, and Spark vs BYOK agents for what each tier includes.
Invite a teammate
- In the Invite a teammate panel, type the person's email address.
- Pick a starting role from the dropdown (Editor is the default). You can change it later.
- Click Send invitation. They receive an email with a link that brings them into this workspace. The new row appears under Pending invitations with the role you chose and an expiry.

Only owners and admins see the invite form. If no seats are available the form is disabled and a note explains how to free one.
Manage pending invitations
Outstanding invitations are listed with the invitee's email, the role they were invited as, and when the invite expires. To pull one back before it is accepted, click Revoke. Revoking invalidates the link in the email immediately and frees the seat it was holding. This is the fastest way to correct a typo in an email address: revoke and re-invite.
Change roles and manage members
The Members section lists everyone in the workspace, sorted with you first, then the owner, then admins, editors, and viewers. Each row shows the person's email, their last sign-in, and their usage this month.
- Change a role. As an owner or admin, use the role dropdown on another member's row to move them between Admin, Editor, and Viewer. The change takes effect immediately. You cannot change your own role or the owner's from here.
- Set a usage cap. Click edit next to a member's usage to open the cap dialog. Enter a monthly ceiling in AI Units, or type
unlimited(or leave it empty) to remove the cap. This is how you keep one heavy user from consuming the whole tenant budget. - Remove a member. Click Remove on another member's row. Removal asks you to type
REMOVEto confirm, because it is immediate: the member loses access, and anything they authored (agents, workflows, schedules, files) reassigns to the workspace owner so nothing is orphaned. - Leave the workspace. On your own row, the action reads Leave instead of Remove. Leaving signs you out immediately and reassigns your authored content to the owner. The owner cannot leave without first transferring ownership.

Transfer ownership
Ownership is the one role you hand off rather than assign. Because the owner controls billing, the target must already be an admin.
- Promote the intended person to Admin if they are not already.
- On their row, click Transfer. Confirm by typing
TRANSFER. - They become the owner and you become an admin. The change is permanent from your side: only the new owner can transfer it back. Both parties re-sign in so their new roles take effect everywhere.
Tips
- Start people as Viewer or Editor and promote later; it is easier to grant more access than to walk it back after someone has changed something.
- Revoke and re-invite is the clean fix for a mistyped invite email; the old link stops working the moment you revoke.
- Set a per-member cap on anyone running heavy Spark work so a single user cannot exhaust the shared monthly budget; you can always lift it later.
- Removal and leaving both reassign authored content to the owner, so nothing your team built disappears when someone moves on.